
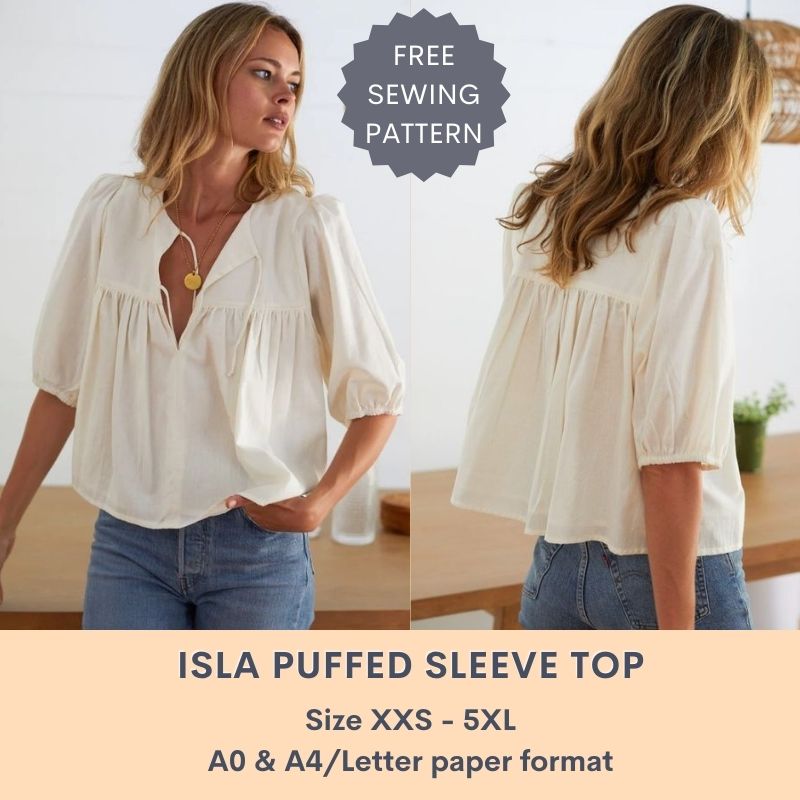
Isla puffed sleeve top is a lovely design inspired by Emerson Fry. It features puffed sleeves, slit front neckline and double tie details. Spend some hours on it and you will get a great piece of garment for your work or day out.
Let’s have a closer look at this design:


As usual, my pattern is made in 10 sizes from XXS to 5XL so you may find a suitable size for yourself. If you are not sure which size suits you, take a look at the measurement table before doing anything here: SIZE GUIDE.
The pattern is made using layered PDF, please check for your desired size before printing so you won’t waste your paper. I have included a first page with many details about sizing and printing, so please first read the first page and make sure you know what size you need! If you still do not know how to print a layered PDF, please check for the printing instruction in this post: PRINTING GUIDE.
My patterns are now made in both A4/Letter paper and A0 paper format so you can print at home or at any print shop!
For home printers, you can print this using your home printer and either A4 or Letter paper. I calculated the printing area so that you will be able to use either type of paper to print the pattern out perfectly. Always print the first page first and check with the test square if you are printing at the right scale before you print out the whole pattern – avoid waste of ink and waste of paper, save the earth!
Some PC may print smaller than actual size even when you choose 100% scale – I don’t know why this problem exist, but my HP laptop cannot print true to size. I have to scale up to 103% to get the right size. You may need to check with your PC to see if it prints true to size, if not, scale up a bit. I was informed by a reader that you can also print the pdf as image to get the right scale, however I never tested it on my computer.
SEWING INSTRUCTION
You will need
- Fabric of your choice. This pattern is intended for woven fabric.
- Some 1/3 inch (1cm) wide elastic for sleeves
- Scissors, pencil or fabric marker, ruler, pins
- Sewing machine/Serger or needle and thread
- Printed pattern
How much fabric do you need for this piece of garment? To be precise, you may need to check how much fabric you need before buying. It will depend on the selected pattern size, the width, and design of the fabric you plan to use. Just to be sure, print all the paper patterns and lay them out at the width of fabric you plan to use (usually from 90 to 150 centimeters or 35 to 60 inches). Measure how much fabric you will need. Don’t forget to account for pieces that need to be cut multiple times and pieces that are cut on the fold.
Cutting instruction:
After printing out and taping all the pattern pages together, you will get something similar to this:

You will see that there are 2 sets of lines on each pattern piece. The inner lines are sewing line (and you sew along these lines), and the outer lines are cutting lines (you cut the fabric along these lines, remember the folding lines where you have to fold the fabric before cutting). The distance between sewing line and cutting line is seam allowance, and it varies from point to point. For example, the side seam allowance is about 1/2 inch (1.2cm), and seam allowance at hemline is 1 inch (2.5cm). This is the reason why I do not remove the sewing lines from the pattern. Please use it as a guide to know how much seam allowance you need to give at each seam.
The fabric will be cut into following pieces:
- Front Yoke: cut 4 (2 mirrored pairs)
- Lower Front: cut 2 mirrored
- Back Yoke: cut 2 on fold
- Lower Back: cut 1 on fold
- Sleeve: cut 2 mirrored
- A piece of bias tape for the tie straps
Place the pattern pieces on the fabric, pin the pattern pieces to the fabric to secure them in place. Using sharp scissors, carefully cut out the fabric pieces along the outer lines of the pattern. Take your time to ensure precise and clean cuts, as this will affect the fit and overall appearance of your garment.
Make sure to mark all notches and other design features such as darts, pleats, draw marks etc. from the pattern pieces onto your fabric. When sewing the garment, pay attention to notches, they must match up.
Sewing instruction:
1. Serge/zig zag stitch the raw edge to prevent fabric from unraveling.
2. Gather the top edge of the Lower Back and Lower Front pieces to match the bottom edge of the Back Yoke and Front Yoke respectively.
3. Make 4 pieces of tie straps. This is a tutorial on How to make spaghetti straps/drawstrings.
4. Place two Back Yoke pieces right side facing, pin and sew the neckline. Trim and clip the seam allowance for smoother curve. Staystitch the seam allowance to the inside piece if needed.
5. Place one pair of Front Yoke right side facing, put the tie strings in between two layers, one at the very top corner of the center front line, one about 4 inches (10cm) from the first string. Sew the neckline and the center seam. Clip corners, seam allowance and turn the fabric over. Staystitch the seam allowance to the inside piece if needed.
5. Place Front Yoke and Back Yoke right side facing, pin and sew the shoulder seams. Fold the lining layer in and press to flatten.
6. Place two Lower Front pieces right side facing, sew the center seam starting from the hem toward the neckline, stopping and backstitching at the notch. Fold the unsewn seam allowance inward and sew to keep it from turning out.
7. Press the seam allowance on the Front Yoke to the wrong side. Place the Lower Front in between two layers, right side facing up, pin and sew very closely to the folded edge to join. You can refer to the first video of this post for a clearer visualization. Repeat with the back of the garment.
8. Turn the main garment over and sew the side seams.
9. Gather the cap of the Sleeve piece, matching the measurement of the armhole opening on the main garment. Sew the under arm seam of the Sleeve. Fold the seam allowance at the bottom end of the Sleeve and sew the hem, leaving 1 inch opening. Measure a piece of elastic so that it fits nicely on your bicep and cut. Thread the elastic piece into the casing created by the sleeve hem and sew two ends of the elastic together. Sew to close the casing.
10. Turn the Sleeve right side out. Pin it to the armhole opening on the main garment so that the right sides are facing. Match the notches, pin and sew to attach the Sleeve to the main garment.
13. Fold and sew the hem of the top. Give it a good iron and you’re done!
If you think sewing with two layers of the yoke is too tedious, you can skip it and use bias binding to finish the neckline.
DOWNLOAD FREE PATTERN FROM HERE: https://tianascloset.com/index.php/product/isla-tie-front-puffed-sleeve-top/
Happy sewing! And don’t forget to share your project on my Facebook page: Tiana’s Closet Sewing Patterns or tag me on Instagram #tianasclosetsewingpatterns, I will be thrilled to see the garment in real life!
Tiana
Pingback: How to smock with your sewing machine » BERNINA Blog
Pingback: Smoken mit der Nähmaschine – Anleitung, Tipps, Schnittmuster
Pingback: Smocks avec points décoratifs » BERNINA Blog
Pingback: 20 Gorgeous Free Blouse Sewing Patterns to Try - Sewspiratrice