
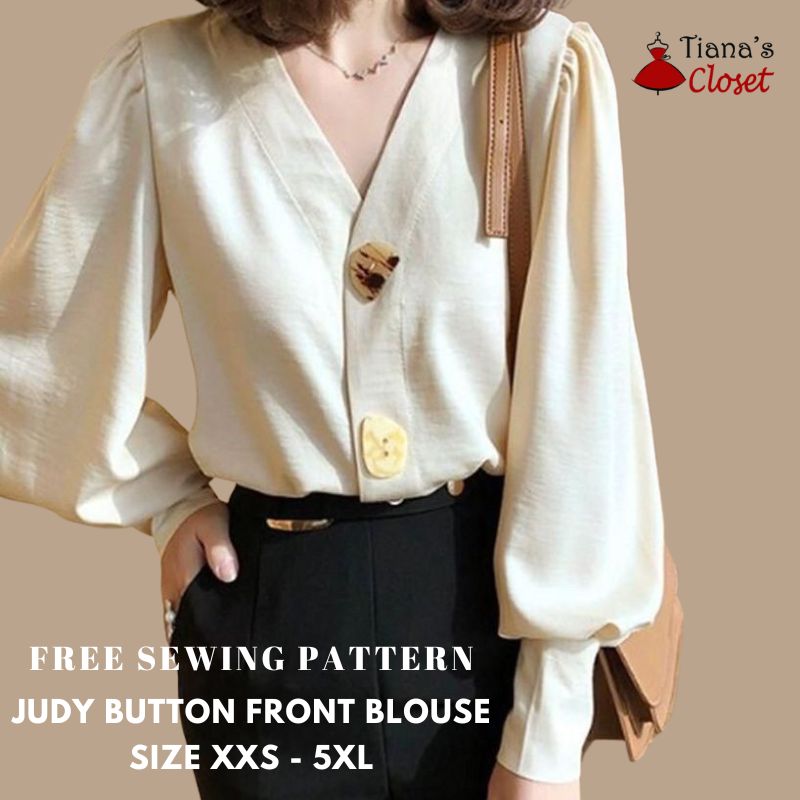
This design was inspired by an image I found on Pinterest, I don’t know the brand or have any information about it, so I guess I should create my own version for it. I name it Judy button front blouse!
The Judy button front blouse features statement buttons at the front – I love this detail, it looks so effortlessly chic, of course you will need to find impressive buttons in the store! Besides, it has voluminous sleeves – yes puffed sleeve is so popular recently!
You can make it using your regular size, or go up one size for a looser fitting – more comfortable and relaxing.
As usual, my pattern is made in 10 sizes from XXS to 5XL, so you will find yourself a suitable size. You can also lengthen or shorten the hemline to get your desired size. Also check your size before doing anything here: SIZE GUIDE.
The pattern is made using layered PDF, please check for your desired size before printing so you won’t waste your paper. I have included a first page with many details about sizing and printing, so please first read the first page and make sure you know what size you need! If you still do not know how to print a layered PDF, please check for the printing instruction in this post: PRINTING GUIDE.
You can print this using your home printer and A4/Letter paper. I calculated the printing area so that you will be able to use either type of paper to print the pattern out perfectly. Always print the first page first and check with the test square if you are printing at the right scale before you print out the whole pattern – avoid waste of ink and waste of paper, save the earth!
Some PC may print smaller than actual size even when you choose 100% scale – I don’t know why this problem exist, but my HP laptop cannot print true to size. I have to scale up to 103% to get the right size. You may need to check with your PC to see if it prints true to size, if not, scale up a bit.
SEWING INSTRUCTION
You will need
- Fabric of your choice. This pattern is made for woven fabric
- Some fusible interfacing
- Large, bold statement buttons for the front
- Smaller buttons for the cuffs (or you can use hooks for the cuffs)
- Scissors, pencil or fabric marker, ruler, pins
- Sewing machine/Serger or needle and thread
- Printed pattern
How much fabric do you need for this piece of garment? To be precise, you may need to check how much fabric you need before buying. It will depend on the selected pattern size, the width, and design of the fabric you plan to use. Just to be sure, print all the paper patterns and lay them out at the width of fabric you plan to use (usually from 90 to 150 centimeters or 35 to 60 inches). Measure how much fabric you will need. Don’t forget to account for pieces that need to be cut multiple times and pieces that are cut on the fold.
Cutting instruction:
After printing out and taping all the pattern pages together, you will get something similar to this image:
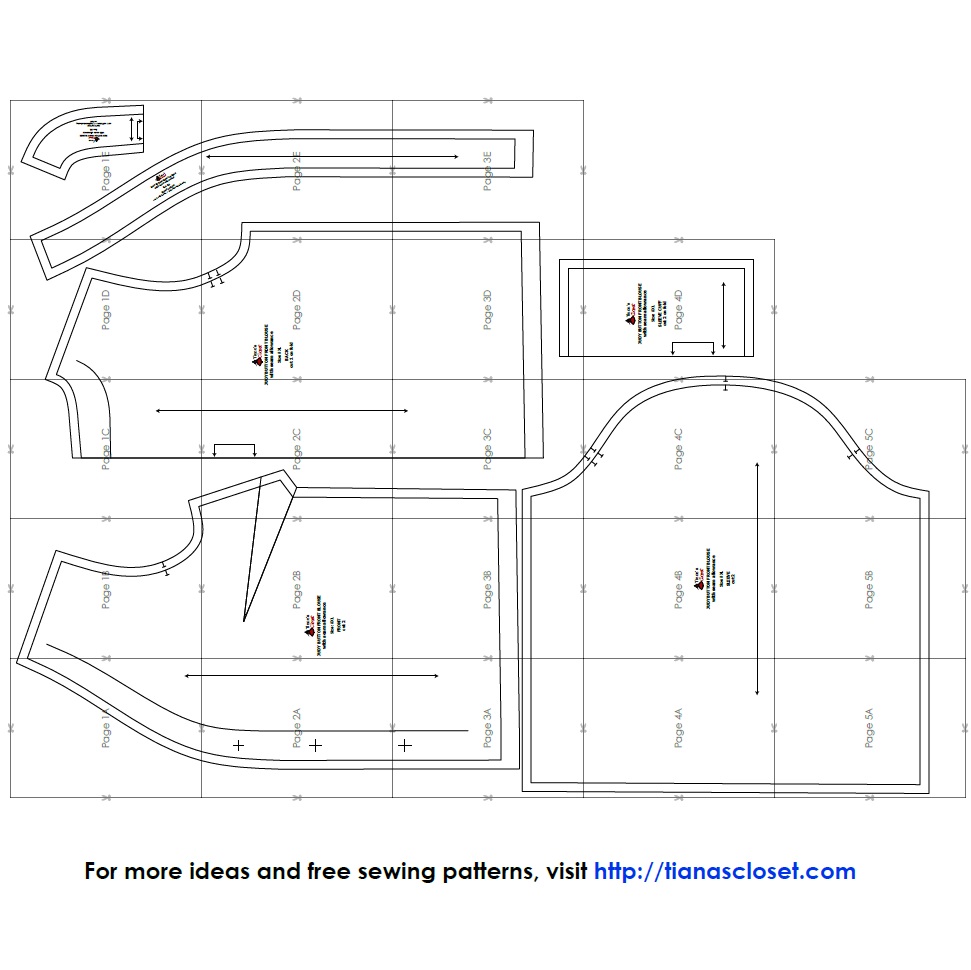
You will see that there are 2 sets of lines on each pattern size. The inner lines are sewing line (and you sew along these lines), and the outer lines are cutting lines (you cut the fabric along these lines, remember the folding lines where you have to fold the fabric before cutting). The distance between sewing line and cutting line is seam allowance, and it varies from point to point. For example, the side seam allowance is about 1/2 inch (1.2cm), and seam allowance at hemline is 1 inch (2.5cm). This is the reason why I do not remove the sewing lines from the pattern. Please use it as a guide to know how much seam allowance you need to give at each seam.
Fabric will be cut into following pieces:
- Front: cut 2
- Back: cut 1 on the fold
- Front Facing: cut 2 self fabric + 2 fusible interfacing
- Back Facing: cut 1 self fabric + 1 fusible interfacing
- Sleeve: cut 2
- Sleeve Cuff: cut 2
Make sure to mark all notches and other design features such as darts, pleats etc. from the pattern pieces onto your fabric. When sewing the garment, pay attention to notches, they must match up.
Sewing instruction:
1. Serge/zig zag stitch the raw edge to prevent fabric from unraveling. Apply fusible interfacing to the neckline facing pieces.
2. Pin and sew the bust darts on the Front pieces.
3. Place one Front piece and Back piece right side facing. Pin and sew shoulder and side seams. Do this with both Front pieces to get the main garment. Measure the length from the notch at the front armhole through the shoulder point to the notch at the back armhole – this is the cap length.
4. Sew two straight lines using longest stitches ¼ and 1/3 inch at the cap of the sleeve (starting from the notch on the back armhole toward the notch on the front armhole). Pull lower threads to gather the fabric until the curved edge of the sleeve cap equals the cap length. Distribute the gatherings evenly. Repeat with the other side.
5. Gather the other side of the sleeve (the edge that will be joined with the cuff) so that it matches the width of the cuff.
6. Sew the side seam of the Sleeve, leaving about 2 inch at the cuff side. Fold the seam allowance to the side and staystitch it to the inside of the sleeve.
7. Fold the cuff in half, right side facing in. Sew the two short sides of the sleeve cuff. Trim the corner and turn the cuff inside out.
8. Sew to join the Sleeve Cuff to the Sleeve.
9. Turn the Sleeve inside out, place it right side facing the main garment at the armhole, matching the notches. Pin and sew to join the sleeve to the main garment.
10. Place Front Facing and Back Facing pieces right side facing. Sew the shoulder seam.
11. Place the joined Facing piece and the main garment right side facing. Pin and sew to attach the facing piece to the main garment. Clip the seam allowance at the curves, turn the facing in, sew along the line to secure the facing in.
12. Hem the garment.
13. Mark the buttonhole position and make the buttonholes. Sew the button.
Although the sleeve gathering detail may be a bit of a challenge to newer sewers, I believe the result will make you happy.
And here is the download link:
JUDY BUTTON FRONT BLOUSE (SIZE XXS – 5XL)
Happy sewing! And don’t forget to share your project on my Facebook page: Tiana’s Closet Sewing Patterns
Tiana
Pingback: OBSESSING Over PATTERNS – the Soft Dramatic