

The world is now falling apart with this hateful coronavirus. I read the news every day and find my heart heavy with more and more confirmed cases and deaths. And I feel even sadder with the attitude of many people. They stock up on all neccessity just like they are seeing doomsday. Many elderly cannot get the things they need because younger and stronger people collected them all.
My mother says this is the worst thing ever happens in her 70-year long life – not the pandemic, but the panic that causes shortage of face masks, toilet paper, instant noodles and other neccessities.
I feel that we need to share more. Don’t rush to the supermarkets and grab all the toilet paper and hand sanitizers, leave some for people behind you. Don’t act like there will be nothing left if you don’t take some stuffs home. The stores will restock next day. You cannot use up a whole pack of toilet paper in just one day, right?
Now back to the main topic today.
The post that has most views on my blog recently is the one about face mask pattern. I know that it reaches people all around the world and feel so happy to see that I can help.
Many people sent me messages about not being able to follow my instruction to sew the mask because they have never sewn before. And I think I should look for a simpler pattern, one that requires less skill, and can still be protective against the (probably airborne) COVID-19 virus.
And there it is, the simplest pattern that I share with you today. It takes only a few minutes from start to finish.
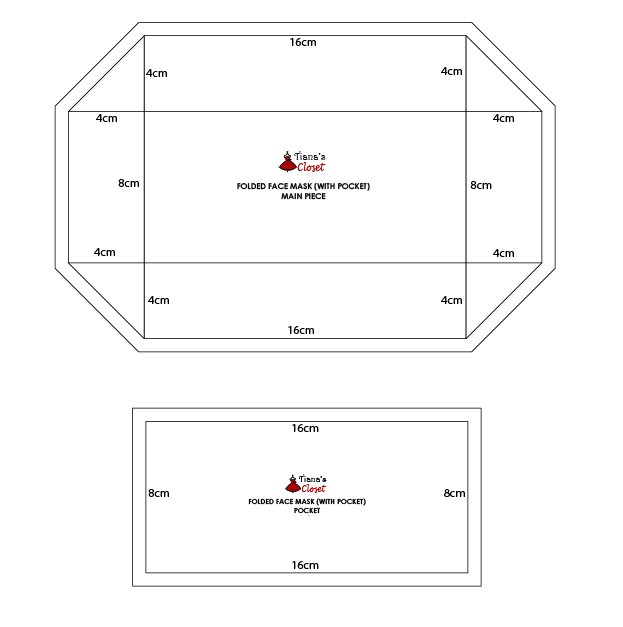
The best thing about this mask is that you don’t need a pattern to sew it. Just draw a rectangle with a few additional lines, and you are ready to sew. Please see the picture below for specific measurements.
Update March 23: Many asked for a pattern of the folded mask with pocket to insert filter fabric, so I updated the pattern and make a PDF file for it. You can download the file and print it out or draw according to the picture below (divide the number by 2.5 if you use inches instead of centimeters)
For adults, the dimensions are 26 cm * 17 cm (10.2in * 6.7in) . For big kids, the dimensions are 24 cm * 15 cm (9.4in * 5.9in). For smaller kids, the dimensions are 22 cm * 12.5 cm (8.7in * 4.9in). All these dimensions are for patterns with seam allowance included. The corners are cut the same for 3 sizes: a triangle with sides of 4cm (1.6in) off from each corner.
If you are looking for materials to make face mask, visit our little store here:
We have plastic nose wire, elastic, non-woven fabric for filters, anti-microbial fabric masks, hand made fabric masks to meet your needs. All items are ready in stock and will be shipped from Toronto, Canada. Same day shipping for orders before 3:00 PM. Free standard shipping for orders from US$75.00.
Download link: Folded face mask with pocket pattern
Friendly reminder: Don’t ever think that having a mask means you are 100% safe from the COVID-19 virus. It only provides partial protection. Practice social distancing, personal hygiene, and wear masks the right way.
Sewing instruction:
This is the instruction for sewing the folded face mask with pocket. If you don’t want to have pocket, skip the steps 2-3 and start from step 4.
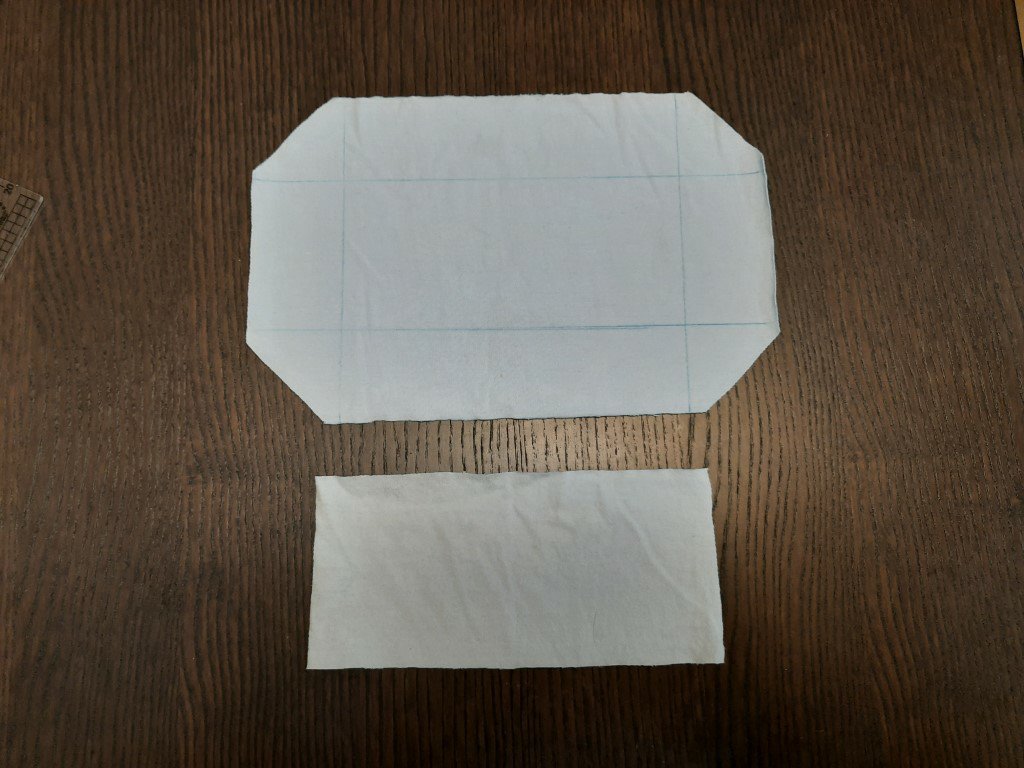
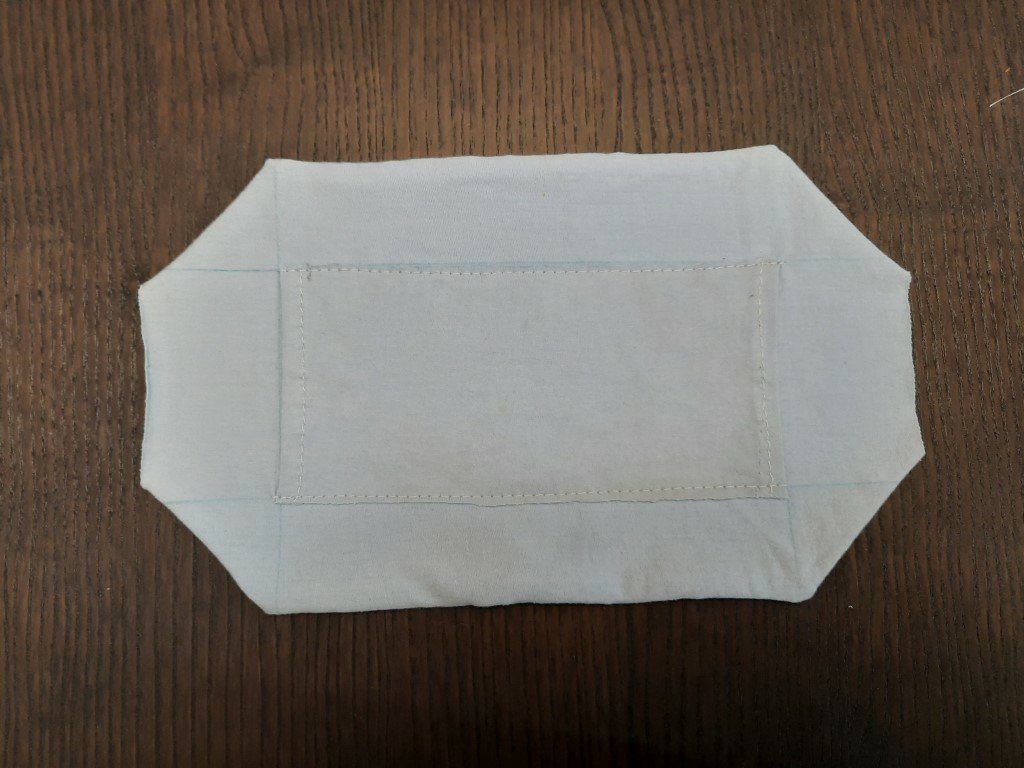
Step 1: Cut 2 main pieces and 1 pocket piece. If you don’t want the pocket, omit the pocket piece. Draw the lines as shown in pattern.
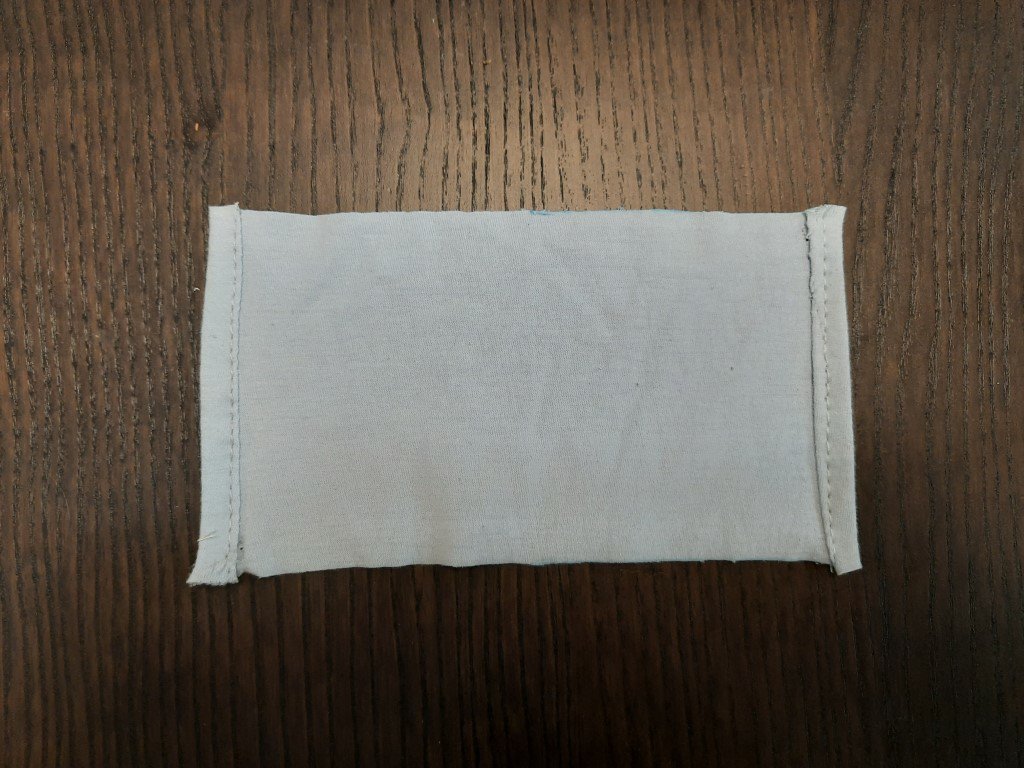
Step 2: Hem the short edges of the pocket piece.
Step 3: Align the pocket piece to the right side of the inner main piece (the layer touching your face). Sew along the long edges of the pocket piece. The stitches lie exactly on the drawn lines.

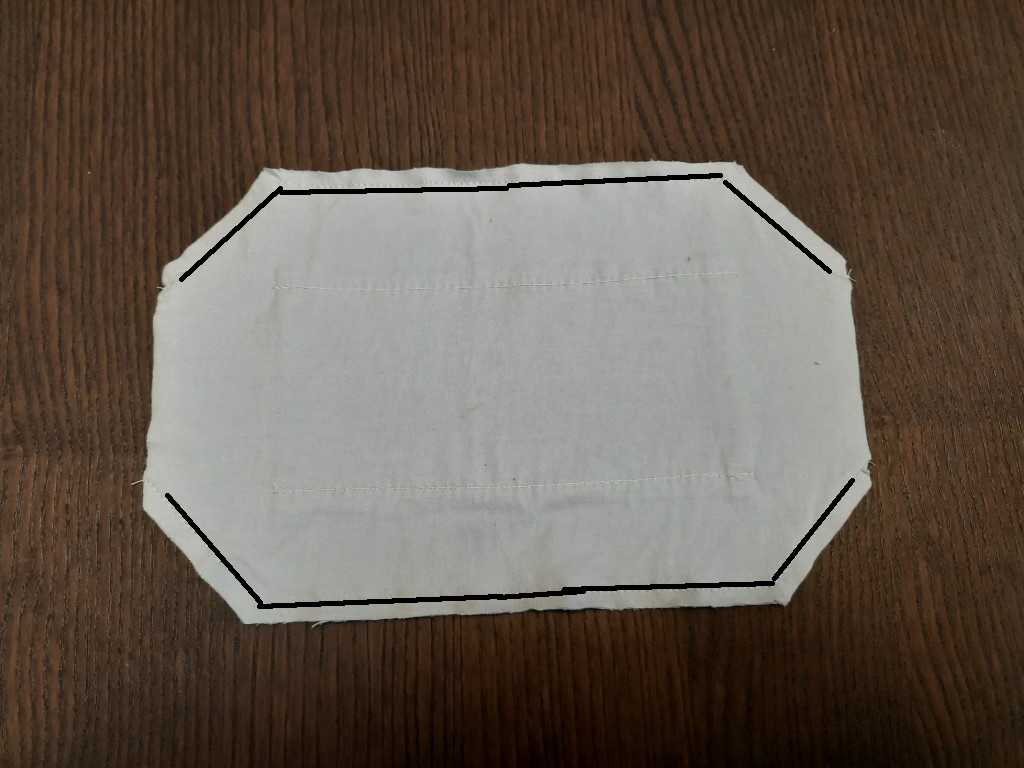
Step 4: Put the main pieces right sides together, sew along the black lines, leave small openings to turn the fabric inside out.
Step 5: Turn the fabric inside out, press to flatten it (if necessary).
Step 6: Fold the fabric along the markings and sew a line 0.5cm from the folded edge to secure it.
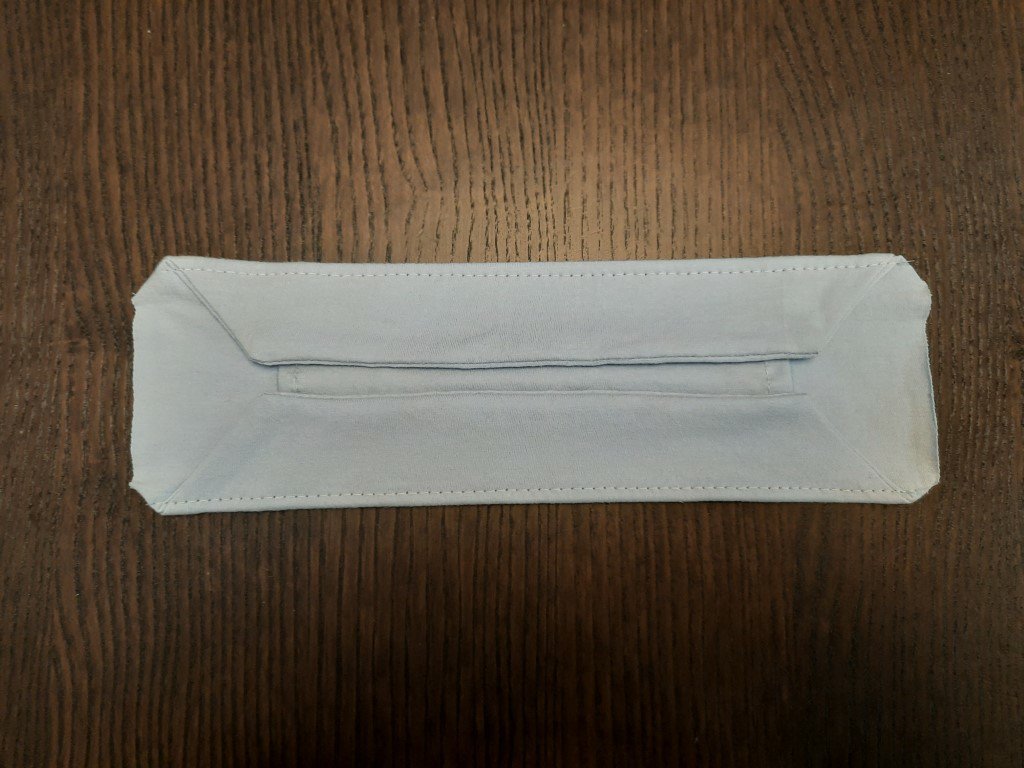
Step 7: Fold one short end twice to hide the raw edge, sew it to make a tube to insert elastic. Repeat with the other side.

Step 8: Thread a 25cm/10in elastic through each tube and tie it. Hide the knot inside the tube. You can adjust the length of the elastic if needed.
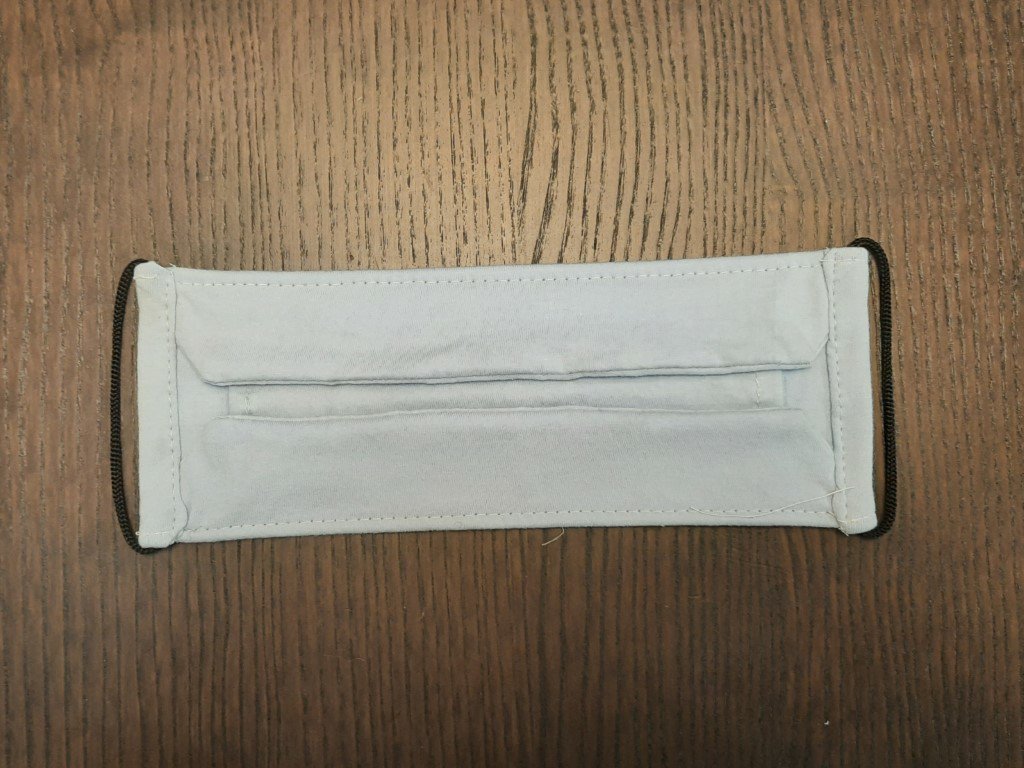
Tada! You’ve made it – a really simple and useful mask! You can see the pocket inside.


My friend made a bunch of them and really liked this design because it’s easier and faster to make than the previous one.

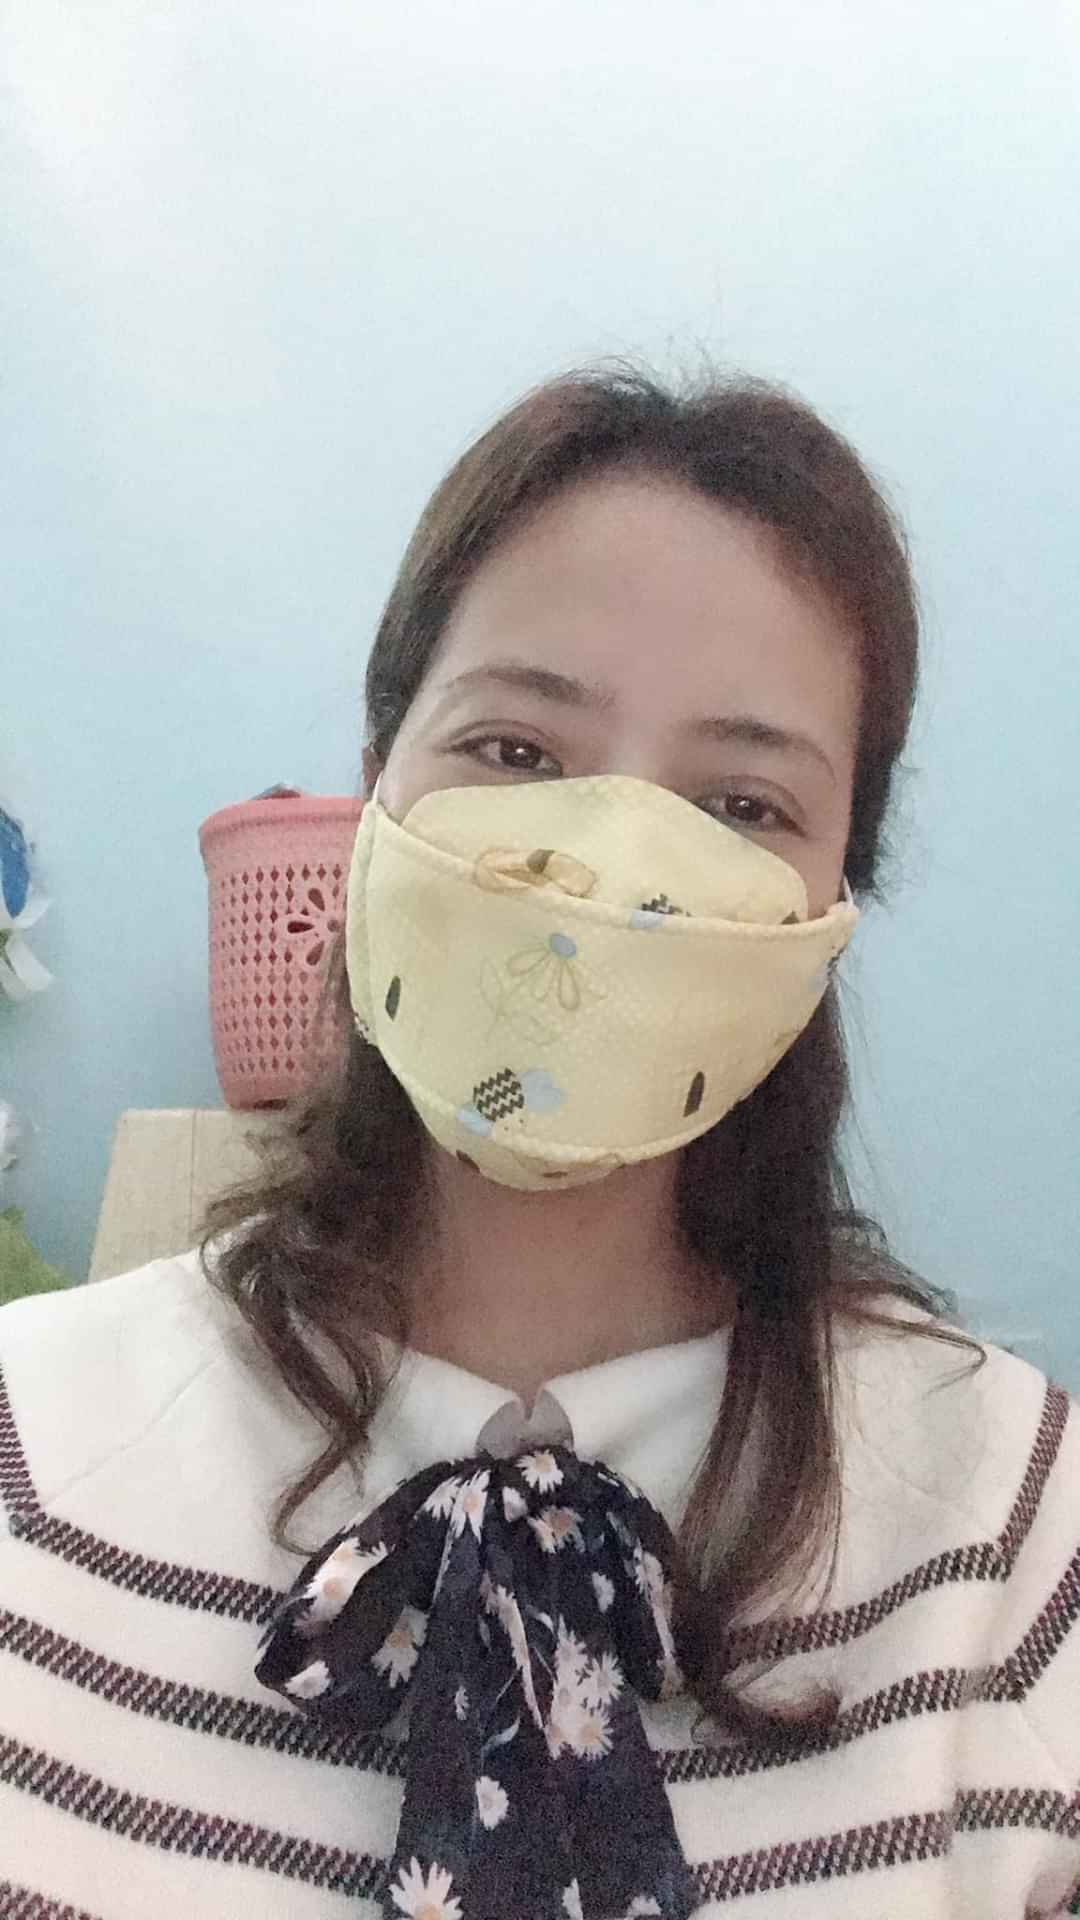
This is how it looks on the face. Well-fitted and quite comfortable.
Hope you guys will love it. Don’t forget that masks cannot 100% protect you from the virus. What you need to do is to refrain from going to crowded places, keep a safe distance from others, and most importantly, WASH YOUR HANDS REGULARLY and DON’T TOUCH YOUR MOUTH, EYES OR NOSE!!!
Stay safe, my friends.
Love,
Tiana
See my other posts in the DIY masks series here:
How to use your face mask the right way
Face mask filter materials – what can we use for DIY face masks?
Do you have a pattern for making a pocket in this type for a filter insert? I’m terrible at creating on my own! Thanks!
Hi, it’s really easy. I guess I will update this soon.
Could we get this update ASAP there are so many in need and filters are more effective. THANK YOU!
Nevermind🤦🏼♀️
I have 3/4 inch wide Elastic, can I use it or is it too wide? Thank you!
I think it’s a bit wide. You can use strips cut from your old T-shirt. Pull the strips so that the sides curl up and you will get something similar to an elastic.
Do you think you could to a piece at the top to put a pipe cleaner in I have so many to make was doing them on the emb machine but taking way to long so I need to figure out how to sew them and I don’t sew to well I was looking at your other pattern also to try to figure out what one is the easiest to sew
Yes, I’m also terrible at creating my own patterns. If you could update to show how to make it with a pocket for filter insert, that would be wonderful. Thank you for sharing this!
Thank you so much I’ve been pulling my hair out trying to make these you made it so easy thanks again
Yes please. And a downloadable PDF for the pattern if possible, too. Thank you SO much for creating and sharing your patterns!
If I use three layers is that not as good as a filter?
Dear Tiana, thank you for sharing this pattern. I am making them for my family and friends.
Much love and appreciation from Suriname!!
Could this pattern be adapted to have ties and not elastic? I’m now having trouble finding elastic.
I’m trying to figure that out too Becky.
No one has elastic- mine is too wide, so I have tried to cut it in half, but it makes it less sturdy- don’t know if it will hold up!
Let me know if you come up with another way!
You can use strip cut from an old T shirt, pull it so it curls up a bit, and use it just like you use an elastic. It is softer on the skin than elastic!
You can also cut tights or leggings. Cut as if you are shortening them, it’s already a tube. It’ll curl in on itself and make a band.
you can use hair elastics. 🙂
I’m trying to find everything for the face masks using things I already have on hand. Maybe you could see if the elastic in an old fitted sheet would work? Just a thought.
Pingback: Sewing your own face mask to protect yourself from the coronavirus pandemic (with pattern and photo sewing instruction) – Tiana's Closet
Great pattern- thank you- have picture if I could upload it
Any idea how to scale this down, or if it needs to be scaled down, for a child?
I have posted the dimensions of the face mask for children. The corners are cut just like the mask for adults.
Tina, you’re not only helping those of us that are looking for ways to help our families, friends & healthcare workers, but you my friend are a Saint for the sake of humanity. Thank you! God will Bless you for posting & finding the best & easiest ways to help others. Thank you! Thank you! Thank YOU! 🙏🏼🥰🙏🏼
Tiana, you are a saint! Whether this pattern is your design or one you found and passed along, I am most grateful. It’s the easiest pattern I’ve seen. I will now be making these for my family and all the families on my street. Thank you, so much!
The https://tianascloset.com website is one of
the best we have found, and the A super easy face mask pattern (with photo tutorial) – Tiana’s Closet article is very well written and useful!
I want to share with you a link that also helped me a lot in cooking:
https://bit.ly/easy-fat-burning-recipes
Thanks and kisses! 🙂
So, there are no dotted lines on the pattern for folding. Where are they supposed to be, please?
Hello, the edges should be folded to the center line. I guess I will update the pattern so it can be easier to follow.
Pattern prints with a 1/4 inch seam which equates to folding over raw edge 1/8 inch. Not enough for anything but very thin rolled elastic, and difficult to sew. Extending it to 1/2 inch allows for use of 1/4 inch elastic sewed in not tied as tied 1/4 inch elastic is difficult to get through the tube. Also allows for ties if elastic hurts your ears and you wear glass’s or oxygen.
Hello, I updated the pattern, and also added a printable PDF file so you can see clearer.
First, thank you so much for this pattern! I can barely sew a straight line, so this pattern looks amazing! However, I think there’s a few problems with the dimensions. The children’s sizes seem to be good between the cm and inches. But the adult size should be 10″ x 7″ instead of 10.5″x 7 3/4″ if my math is correct.
If possible, could you please make a downloadable PDF that’s to scale, with the seam allowance and and sewing lines added? It would be a fantastic help for folks like me who can’t sew hardly at all. Thank you SO MUCH!!
Oh, and directions for a pocket for inserts, also. Sorry if I sound demanding, I’m just so excited about how easy this pattern looks! Bless you and your family!
Hello, thanks for the enthusiasm. I have updated the pattern and uploaded the PDF file for you and those who are new to sewing like you. Enjoy sewing!
any printing tips? because I am having issue with it cutting off
This would be easier to visualize if you actually used a colored fabric instead of doing the whole thing in white.
Sorry, I am out of printed fabric after many days sewing masks and giving them away 🙂
Thank you so much! This is but far the easiest and best fitting mask I have made. I’m going to make a few for my little guys too. I really appreciate it.
Thanks Tiana! This novice sewer found your pattern easy to draw with a ruler, pencil, and paper, and easy to sew! PS everyone- 1 yard makes 8 face masks
Just a quick question what type of material are you using and what are you using for the filter in the pocket.
Any chance you could give us the dimensions of the 3 sizes (especially the children sizes) in cm and/or inches? I don’t have access to a printer and the written sizes were a big help for me. Unfortunately I didn’t write them down and was just going by the website every time I made one. It was great how it was written on the pattern.
For big kids, the dimensions are 24 cm * 15 cm (seam allowance included)
For smaller kids, the dimensions are 22 cm * 12.5 cm (seam allowance included)
The corners are cut just like the pattern for adult (cut a triangle with sides of 4cm off from each corner).
All the best,
Tiana
Thank you Tiana!
Can you post the dimensions for the child size mask 😷 I didn’t see it. Thanks
For big kids, the dimensions are 24 cm * 15 cm (seam allowance included)
For smaller kids, the dimensions are 22 cm * 12.5 cm (seam allowance included)
The corners are cut just like the pattern for adult (cut a triangle with sides of 4cm off from each corner).
Парсер гугла без проблем.
Видео смотрите сами
https://www.youtube.com/watch?v=ka0rXoSPsV4
Would you be able to add directions/information on how to add bias tape ties as everywhere I search, there is no elastic to be found.
TIA from this novice sewer. Love this pattern.
JoAnn
Joann, if I may add to the conversation, I cut 1-inch wide strips off an old t-shirt and pulled them to curl (as is done when making continuous t-shirt yarn) to get a thin, flexible cord to use as ties. Hope this helps.
Could you please also show the measurements in “inches” -vs- cm? I don’t know how to convert it (sorry) and I would love to use this as it seems to be the quickest one I could find. Thank you in advance!!
You only need to divide the numbers by 2.5 to get the measurements in inches
Tiana, one question, the measurements seem to have changed from the first (more simple) post you did. Will the first set of measurement for adult and child still work?
Yes, the numbers changed a bit because I did not add seam allowance this time. Seam allowance is added after the drawing is done. After adding seam allowance, the measurements are the same.
What are the original measurements??
What can be used as a filter insert?
Ideally the activated carbon filter, but it can’t be found anywhere now. Someone mentioned vacuum cleaner filter and said it was good.
I’ve read (https://diymask.site/) that two or three layers of kitchen paper towel or tissues is better than no filter. Just discard them after use and replace them with fresh ones every time. Great pattern, Tiana – thanks so much!
I have a new queen size bed skirt, I do not use bedskirts I had read where you can use the material that goes over your box springs as a filter that’s what I have been using it works wonderful I sew it onto the front inside part of the mask and then complete the rest of the mask it is totally washable the one thing by sewing it in it is not removable. Do not use the fabric that hangs to the floor only the part That goes over the boxspring.
Can we wash them in the machine and use them again,
Hanneke
Yes, as long as the fabric is durable enough. You can wash with hot water to kill all the virus.
Thank you very much for this pattern . There are so many out there but I like this one the best. You explain things so well. Sharon
Can You please make a post or something with the original instructions for this (without the pocket for the filter?) or even
Send me the picture of the original one (I think the pattern had the sizing in the actual photo)
Hell, and thank you for this tutorial and this design !
I’m not sure I understand step 5 ‘Turn the fabric inside out’. How do you do that ? Is it through the short side ends that do not appear to have been sewn at the time ? Ca you help me out ?
Thanks, and everyone take care in these difficult times
Yes, turn it through the unsewn short side ends. Take care!
Thank you for your quick response !
If you don’t have a working printer (like me) and would like to get the pattern, here’s what I did: Right click the image of the pattern, click View Image, get out your measuring tape, hold Ctrl + to zoom, Ctrl – to zoom out, until the sample square equals the dimensions it says it should be, white piece of paper against your screen, trace template. 😀 Worked perfectly for me! Now if my minimal sewing skills and lack of sewing machine will allow me to make a decent mask I’ll be really happy! Anything is better than nothing, though, right? Thank you so much for the template and instructions. ❤ Be safe, everyone.
Question,,, the curved parts that that is over the nose and chin thats is under the long piece,,, Is that part of the flaps from the long piece? It looks more curved … Also How long should the elastic bands be to fit properly? What can i use for a filter? i dont have any fabric like that. Thanks
Yes, they are the flaps from the long piece, after sewing and pulling them out, putting the mask on your face it will look a bit curved. The elastic is about 10in/25cm. Some people say a few layers of tissue paper can be better than nothing.
Love loveloooove this design! Thank you soooo much!
In your opinion, what is the best fabric to use?
Is there a good way to make a way to add a piece to the bridge of the nose to mold a pipe cleaner ?
Great pattern, it is super easy to make and fits very well. I will share that when I made mine, I used tightly woven cotton fabric (like quiltmakers use) a different color for inside and outside. I also used non-woven iron-on interfacing on both pieces, this makes a filter of its own (so it is four layers, two tightly woven and two non-woven). A nurse suggested doing this on another pattern I found. For the elastic, I used very thin, flat elastic that I had on hand and I made it 3 times the length of the tube it was inserted into, this gave me enough to tie off and it still fits. To pull the elastic through the tube, use a crochet hook, if you have one, it is much easier that way. 🙂 Thank you so much for this pattern! This is the 2nd mask I have made and is by far the easiest and best fitting one. I will be making more to use and share.
Thank you for your comment. I suggest you use strips cut from old T-shirt to replace elastic (pull before inserting through the tube). They are softer on the skin. Stay safe!
For the filters, people have mentioned using coffee filters and cutting them to fit. There are the basket kind and also the cone type. Easy, cheap, at least 100 in a pack and disposable…worth a try
Where can I find the pdf for the instructions?
Susie
Sorry, I do not have one, only the instruction on my website.
Pingback: If you can sew, you can help those on the front lines of the COVID-19 fight — Berkeleyside | Covid-19 Outlook
Super fun model to make, I recommend this model, with easier to fit glasses.
A big thank you from Quebec, Canada
I’ve been watching a lot of YouTube videos on mask making and one said to use HEPA filters from a vacuum bag as a filter. Another said to use hair band elastic to go over the ears and another one said to hot-glue pipe cleaners with the ends folded back on itself (so it doesn’t poke your skin through the fabric) on top of the mask to make a more form fitted mask over the nose. If it was me, I would tack the pipe cleaners inside of the mask fabric between the lining and the outside fabric. I’m going to use left over pieces of printed fabric for the outside fabric and some soft t-shirt fabric for the inside or perhaps flannel if I can find some in my sewing stash. Thank you for the patterns. I like yours the best that I’ve seen.
Made several of this type today. Came out beautifully. I ordered HEPA fabric and placed it in the pocket. Thank you for your detailed instructions and offering this service to the public.
Can you give me the measurements in inches. please…
For adults, the dimensions are 10.2in * 6.7in. For big kids, the dimensions are 9.4in * 5.9in. For smaller kids, the dimensions are 8.7in * 4.9in. All these dimensions are for patterns with seam allowance included. The corners are cut the same for 3 sizes: a triangle with sides of 1.6in off from each corner.
Both of your designs are very clever and easy to make. Because the stitching on both masks goes across the mouth and nose area, making small punctures, they are much less effective against coronavirus than a continuous piece of fabric. One group that I am working with will not accept the “Ninja” style for this reason.
Hi, I’m petite and found the dimensions work great for me face. However, the mask doesn’t fit my husband’s face. I’m going to add another inch of fabric from nose to chin.
I made a ‘big kid’ mask for my 6-year-old neighbor but his mom says it’s too small so I’ll make him an adult mask. She said the one I made for her fits him better.
Thank you for your feedback. I will update the pattern for adult male’s size and kid’s size.
I understand the pocket option for filter but don’t see what part to leave open to insert filter as your pic looks like its been sewed all the way around. Any and all feedback much appreciated. And thanks for sharing your pattern.
Hi, you leave the short sides of the rectangle open, only sew the long sides to the main fabric. I will soon add a video about this so you can see clearer.
Thank you so much! 🙂
For the pocket I wanted to know how not to see the cut edge of the fabric when you cut the edge of the mask.
For the pocket I wanted to know how not to see the cut edge of the fabric when sewing the edge of the mask.
Made one today for my granddaughter! An easier way to deal with the elastic is to tie or sew the ends of the elastic together into a loop and then lay one side of the loop inside the turned under edge before you sew it. No trying to push the elastic through the fabric channel that way. Thanks for offering this pattern and tutorial!
Thank you for some creative and comprehensive designs.
I’ve made a couple dozen of the form fitted facemasks.
For larger heads, I increased the size by 20%.
It takes a while because I flat fell the center seams and stay stitch the top and bottom to create more structure.
I’m looking forward to trying this new one.
Take care and keep a healthy mind and body.
I am not able to find the print icon to print your directions! Can you or someone give me any suggestions! I am on my kindle fire. I usually don’t have trouble printing. This is the first time in your site. Thank you. Trying to print directions for folded face mask.
Pingback: How to wear your face masks the right way – Tiana's Closet
Pingback: The Easiest DIY Face Mask Ever (No Pattern Needed) – With Photo Tutorial – Tiana's Closet
Thank you so much! I have tried many different patterns, and this has become my top choice for simple cutting, quick sewing, and easy on/off. This adult size works perfectly for male/female. I wear glasses, and this design does not need wire to limit steaming. It’s a good fit around the nose. I am using the legs from old nylons/tights cut into quartered strips for the elastic. They are soft, stretchy, and strong. The loop holders allow for ear loops or a full head tie. Using patterned fabric on the outside, plain white on the inside. The pocket adds one more layer even without filter. BRAVA!
Pingback: Simple DIY face mask that can be done in no time (even without a sewing machine) – Tiana's Closet
Thank you so much!
Pingback: The 1-minute no sew face mask – Tiana's Closet
Where can we find the pattern for the yellow mask worn by the young lady in your post? The top flap appears to be curved. You mention that the new design is easier to construct but I do not see other directions for a mask similar to the white one pictured. Thank you!
The yellow mask was made from the same pattern in the post. When you put it on your face, it will be curved a bit like in the pic.
Thank you so much for the pattern.
I tried several patterns for masks. This one is by far the most comfortable! It also helps with foggy glasses. I’ve been making masks for my coworkers at Sprouts Farmers Market and everyone LOVES this design. Great job Tiana!
What width should the finished mask be? I followed all of the directions but it seems wider and doesn’t seem to fit as well as your example.
People have bigger or smaller face, so it will not fit all the same way. The finished width of the adult’s mask is about 24cm/9.4in. You can try shortening the elastic for better fit. If you still feel that it’s too big, make another one, reduce the width of the rectangle at the center by 2.5cm/1in and you will get a smaller one (the triangles at the corners are kept as is).
This is the MOST comfortable mask!!! I have tried 6 different patterns, olson, pleated, ragmask, Florida 1 and Florida 2. I wear this mask all day at work!
Least glasses fogging of any design! I can move my head around and no gaps or pulling on your ears. No straps or ties around your head that make your neck ache. So quick to put on and take off. Cut T-shirt into 1 inch strips and pull to curl the strip makes the most comfy ear loops/straps! I made the filter pocket material 5 1/2 inches tall and only sew it to the top edge of the mask, so the filter fabric is a flap that is not sewn at the bottom, bottom is hemmed like the sides of the filter fabric. My filter is sized to go from the top edge to the bottom edge when the mask is fully opened up. Top and bottom of the filter is curved to match the curves of the finish mask,
LOVE THIS DESIGN!!!! Thank you TIANA!!!!!!
Dear Kelley,
Thank you for your feedback. I am happy to know you like it!
Hi, Tiana! I love your story, and I hope Canada has been good to you, personally and professionally. I thought I had seen round elastic for sale on your site, but when I came back to order some, I couldn’t find it! Perhaps I’m remembering wrong and saw that on some other site…? Can you help me?
Tiana,
Thank you so much for a toddler pattern on the three sizes of your pattern, and for the print (not uTube) instructions! Had to look forever to find the size, and printed instructions. Have made almost 100 masks in the Olsen pattern, wanted to try this one, and your instructions/pattern are great.
Thank you so much!
Thank you thank you thank you for the pattern and the tutorial. I love the face mask. It is so comfortable and I can slide the nose part under my glasses so they don’t fog. I have made around 350 masks that I have donated to anyone in my community that needed one. I couldn’t get elastic so used the stretchy yoga headbands and cut them to use instead of elastic, which is very comfortable on the ears. I have made the smaller size mask for children of friends, family and some schools in my city. I have also included the list of filter suggestions when donating the masks. I am so appreciative of your website and the pattern that you allowed me to download. Also being able to download the print instructions was beneficial, as I needed to see the pictures to understand the instructions. Sewing has really been therapeutic for me during the pandemic.
Pingback: Free PDF pattern: 2 layer face mask with filter pocket – Tiana's Closet
Pingback: The Price Of Pandemic Opportunities – Laptops, Public Policy And Science Awareness - redqueeninla
Pingback: TogetherApart: Co-location And Collaboration Constrained By Pandemic - redqueeninla