
I am so happy to know that my blog is reaching people! Yesterday a beloved reader from India asked me to make her a saree pattern – and I am more than happy to do so! And the result is the Ruby saree pattern that I am sharing today!
This Ruby saree features a bateau neckline, princess seam and half sleeves. It has a very close fit – just like how you see all other saree blouses on the Internet. At first, the Indian friend told me that my Amy crop top did not work well and did not fit properly when she altered it to make the saree blouse in her first attempt. I understand that, the Amy crop top falls at the natural waistline while the saree blouse stops above that level, so the fit is not the same.
The Ruby saree blouse pattern is made by her request, and I am happy to share it with others. Let’s see how it looks in 3D simulation:


Can you see the very beautiful seam line? I really love princess seam, because it hugs the curves so well.

Of course this is just the very basic simulation. In real life, you can add more details to make the saree blouse look better. For example, a line of buttons can be a nice addition to the back of the item.
And because my beloved reader asked me to make the pattern in sizes so that she can make more sarees for her family members, I graded it up to size 5XL. Here’s how it looks on my size 5XL model:


You can also try this pattern on various fabrics and prints. I am so in love with this beautiful pattern!


The pattern is made using layered PDF, please check for your desired size before printing so you won’t waste your paper. If you still do not know how to print a layered PDF, please check for the instruction here.
You can print this using your home printer and A4/Letter paper. I calculated the printing area so that you will be able to use either type of paper to print the pattern out perfectly. Always print the first page first and check with the test square if you are printing at the right scale before you print out the whole pattern.
Cutting instruction:
After taping down all the pages following the instruction, the overall layout of the pattern pieces is like this:
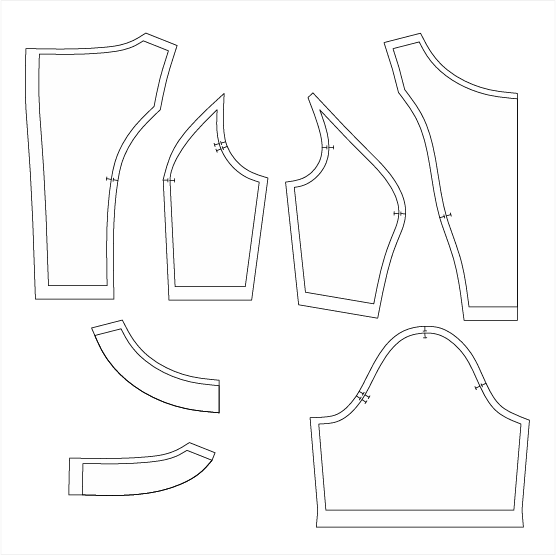
The pattern pieces are to be cut as follows:
A. Center Front – 1pcs
B. Side Front – 2pcs
C. Center Back – 2pcs
D. Side Back – 2pcs
E. Front Facing – 1pcs
F. Back Facing – 2pcs
G. Sleeve – 2pcs
How to sew the Ruby saree blouse:
- Cut the fabric according to the pattern pieces. Iron the fusible facing pieces to the main facing pieces. Serge to prevent fraying.
- Place the front side panel and the front center panel right side facing, the bust point notches matching, sew the princess seam. Repeat with the other side. You can sew a flat felled seam along the princess line.
- Place the back side panel and the back center panel right side facing, matching the notches and sew the back princess seam. Repeat with the other side.
- Sew the shoulder seams and the side seams of the blouse.
- Sew the shoulder seams of the facing pieces.
- Place the facing and main blouse right side facing, matching the notches and sew the neckline. Turn the fabric out and sew a flat felled seam on the facing. Clip the seam at the curves for smoother neckline.
- Sew the side seam of the sleeve. Turn the sleeve in side out.
- Join the armhole of the sleeve and the blouse, matching the notches and sew.
- Attach zipper at the back of the blouse. You can use invisible zipper or exposed zipper.
- Press the hem and finish hemming by sewing or hand sewing a blind hem.
This is the link to download this pattern: Ruby saree blouse
Happy sewing!
Tiana
Pingback: My Homepage
Hi could you please tell me if I can use stretch fabric for this pattern