
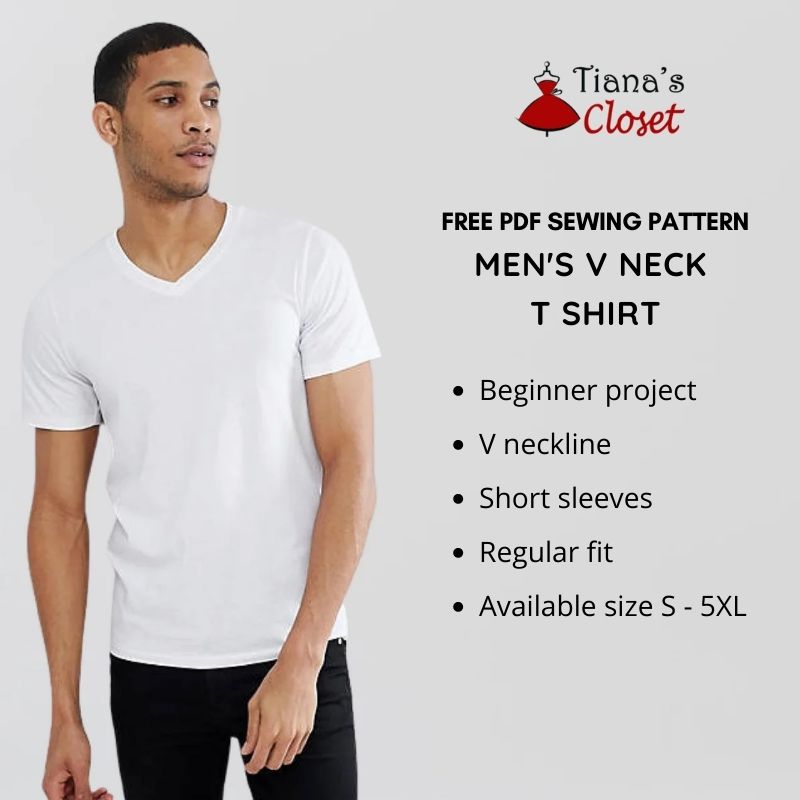
I am sharing the pattern for men’s V neck short sleeve t shirt. This is a basic sewing pattern that does not require a whole lot of skills, and you can make one for yourself with just basic knowledge of fabric and sewing.
I love making simple T shirt for my hubby. It is so quick and easy, and for someone who prefers to stay simple, he would rather have a bunch of identical T shirt rather than many fashionable things (this is also a reason why I do not have many men’s pattern).
If you want to be more stylish, try some ideas for mixing V neck T shirt. There are many ways to style it to create a variety of different looks. Here are a few ideas to get you started:
– Casual: Pair the t-shirt with jeans or shorts and sneakers for a laid-back, comfortable look.
– Layered: Layer the t-shirt over a long-sleeve shirt or under a denim or leather jacket for a cool, edgy vibe.
– Dressed up: Dress up the t-shirt by pairing it with a blazer, dress pants, and dress shoes. This is a great option for a semi-formal event or a night out.
– Athleisure: Wear the t-shirt with joggers or athletic shorts and sneakers for a sporty, on-trend look.
– Beachy: Pair the t-shirt with swim trunks or board shorts and flip flops for a relaxed, beachy look.
When it comes to styling a men’s V-neck short-sleeve t-shirt, the possibilities are endless. Experiment with different combinations and accessories to find the look that’s right for you!
My pattern is made in 8 sizes from S to 5XL so you may find a suitable size for yourself. I’ve been receiving positive comments about how the larger sizes help, and I’m so happy about it! If you are not sure which size suits you, take a look at the measurement table before doing anything here: SIZE GUIDE.
The pattern is made using layered PDF, please check for your desired size before printing so you won’t waste your paper. I have included a first page with many details about sizing and printing, so please first read the first page and make sure you know what size you need! If you still do not know how to print a layered PDF, please check for the printing instruction in this post: PRINTING GUIDE.
You can print this using your home printer and A4/Letter paper. I calculated the printing area so that you will be able to use either type of paper to print the pattern out perfectly. Always print the first page first and check with the test square if you are printing at the right scale before you print out the whole pattern – avoid waste of ink and waste of paper, save the earth!
Some PC may print smaller than actual size even when you choose 100% scale – I don’t know why this problem exist, but my HP laptop cannot print true to size. I have to scale up to 103% to get the right size. You may need to check with your PC to see if it prints true to size, if not, scale up a bit.
SEWING INSTRUCTION
You will need
- Fabric of your choice. This pattern is made for knit.
- Scissors, pencil or fabric marker, ruler, pins
- Sewing machine/Serger or needle and thread
- Printed pattern
How much fabric do you need for this piece of garment? To be precise, you may need to check how much fabric you need before buying. It will depend on the selected pattern size, the width, and design of the fabric you plan to use. Just to be sure, print all the paper patterns and lay them out at the width of fabric you plan to use (usually from 90 to 150 centimeters or 35 to 60 inches). Measure how much fabric you will need. Don’t forget to account for pieces that need to be cut multiple times and pieces that are cut on the fold.
Because you are making this T shirt with knit fabric, just remember a few tips:
- Choose the right needle: Use a ballpoint or stretch needle when sewing with knit fabrics. These needles have a rounded tip that slides between the fibers of the fabric instead of piercing them, which helps prevent the fabric from tearing or snagging.
- Use the right thread: Use a stretchy thread, such as wooly nylon or a stretch polyester thread, to sew seams and hems on knit fabrics. These threads have some give, which allows them to stretch with the fabric and prevent the stitches from popping.
- Pre-wash the fabric: Wash and dry your knit fabric before you start sewing to prevent shrinkage and ensure that the finished garment will maintain its shape.
- Cut with care: When cutting out your pattern pieces, use a rotary cutter or sharp fabric scissors to ensure clean edges. Be sure to cut the fabric with the grainline and stretch direction in mind.
- Use stabilizers: Use strips of stabilizer or stay tape along the seams and hems of knit fabrics to prevent stretching and distortion.
- Test your stitch: Before sewing your garment, test your stitch on a scrap of fabric to make sure the tension and stitch length are correct. A straight stitch or zigzag stitch are good options for knit fabrics.
- Press carefully: When pressing your knit fabric, use a low heat setting and a pressing cloth to prevent the fabric from stretching or scorching.
Cutting instruction:
After printing out and taping all the pattern pages together, you will get something similar to this image:
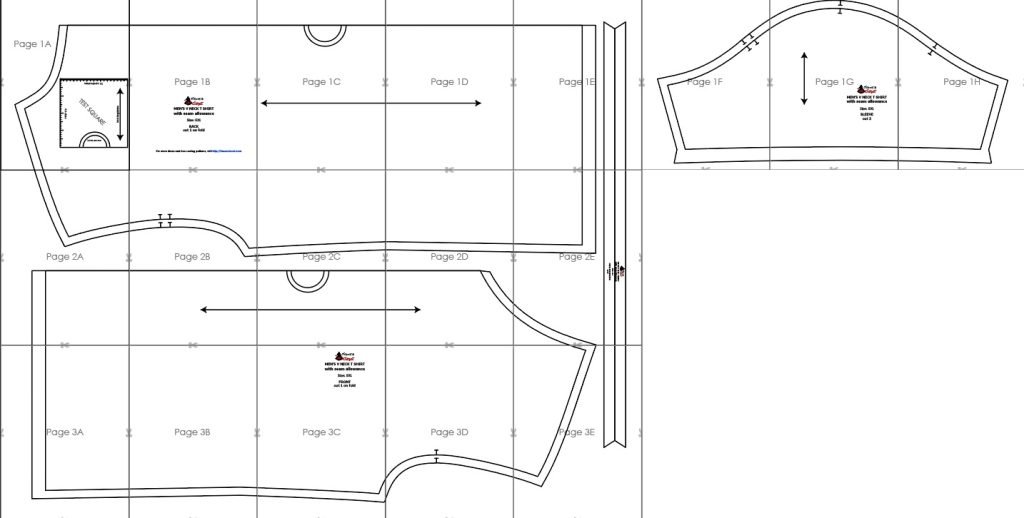
You will see that there are 2 sets of lines on each pattern size. The inner lines are sewing line (and you sew along these lines), and the outer lines are cutting lines (you cut the fabric along these lines, remember the folding lines where you have to fold the fabric before cutting). The distance between sewing line and cutting line is seam allowance, and it varies from point to point. For example, the side seam allowance is about 1/2 inch (1.2cm), and seam allowance at hemline is 1 inch (2.5cm). This is the reason why I do not remove the sewing lines from the pattern. Please use it as a guide to know how much seam allowance you need to give at each seam.
Fabric will be cut into following pieces:
- Front: cut 1 on the fold
- Back: cut 1 on the fold
- Sleeve: cut 2
- Neckline binding: cut 1
Make sure to mark all notches and other design features such as darts, pleats etc. from the pattern pieces onto your fabric. When sewing the garment, pay attention to notches, they must match up.
Sewing instruction:
1. Place Front and Back piece right side facing. Pin and sew the shoulder and side seams.
2. Sew the side seam of the Sleeve. Fold the sleeve hem and sew.
3. Turn the Sleeve inside out. Pin to the armhole of the main garment, matching all the notches. Sew to attach Sleeve to main garment.
4. Use Neckline binding to finish the neckline.
5. Hem the garment.
This is a super quick and easy project. You will easily make a few in just a free afternoon. I usually make a dozen for my husband to wear for a long time lol.
And here is the download link:
MEN’S V NECK SHORT SLEEVE T SHIRT (SIZE S – 5XL)
Happy sewing! And don’t forget to share your project on my Facebook page: Tiana’s Closet Sewing Patterns
Tiana