
The Emma dress is a great choice for those who want to finish a quick project. With just a few details, this dress can be finished within hours and you can get a nice feminine dress for a day out.
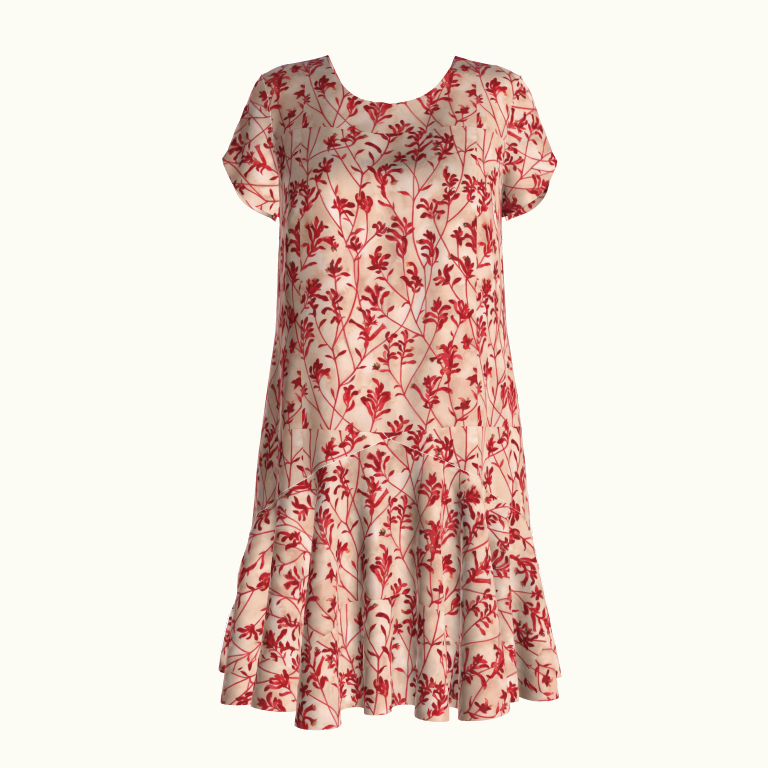
The Emma dress features a loose fit, round neckline at the front with V neckline at the back, a curved sleeve hem and a fluted hemline. This design is great for those who want to cover up the flaws in their body shape, especially for those who have big tummy.
Let me show you how it looks in 3D simulation. The simulation is done with 95% accuracy, so you will have a very nice view of you it will turn out in real life:

And here it is in color block. I really love this color combo 🙂


Notice how the sleeve is curved? I love how it looks like a flower bud.


This dress also looks great on larger women. Here it is on a size 5XL model:


The pattern is made using layered PDF, please check for your desired size before printing so you won’t waste your paper. If you still do not know how to print a layered PDF, please check for the instruction here.
You can print this using your home printer and A4/Letter paper. I calculated the printing area so that you will be able to use either type of paper to print the pattern out perfectly. Always print the first page first and check with the test square if you are printing at the right scale before you print out the whole pattern.
Cutting instruction:
After taping down all the pages following the instruction, the overall layout of the pattern pieces is like this:

The pattern pieces to be cut as follows:
A. Front – 1pc on the fold
B. Back – 1pc on the fold
C. Sleeve – 2pcs + Lining 2pcs
D. Front Flounce – 1pc on the fold
E. Back Flounce – 1pc on the fold
F. Front Facing – 1pc main fabric + 1 pc fusible interfacing
G. Back Facing – 1 pc main fabric + 1 pc fusible interfacing (on the fold)
SEWING INSTRUCTION
1. Serge/zig zag stitch the edges of fabric to prevent unexpected unravelling.
2. (Optional) Sew the Pocket pieces to the Dress pieces
Video tutorial on sewing side seam pocket: https://tianascloset.com/index.php/2018/02/22/adding-side-seam-pockets-to-the-dress/ (video at the end of the post)
– Take one Pocket piece and line the straight edge up with the side seam of the Front Dress, right sides facing, the top point of the Pocket piece matching the notch on the side of the Front Dress.
– Sew to attach the Pocket to the Front Dress piece. Fold and topstitch seam allowance to the right Pocket piece. Repeat with the other side of the Front Dress.
– Use similar method to sew the Pocket pieces to the Back Dress. Do not staystitch seam allowance onto pocket piece.
3. Sew the Front Flounce to Front Dress
– Place the Front Flounce and the Front Dress right sides facing, carefully match the joining seam and pin into place.
– Sew to join two pieces together. Start from the side, go along the seam, pivot fabric at the center point and continue to the other end.
4. Sew the Back Flounce to Back Dress
– Place the Back Flounce and the Back Dress right sides facing, carefully match the joining seam and pin into place.
– Sew to join two pieces together.
5. Sew the Main Garment:
– Place the Front Dress and Back Dress right sides facing. Carefully match the shoulder seam, side seams, flounce seam and pocket pieces. Pin into place.
– Sew the shoulder seams.
– Sew the side seams. Start from the armhole down, pivot needle at the pocket corner, continue around the pocket, pivot needle again at the end of pocket and sew down to the hem of the dress.
6. Sew the Sleeve
– Place one Sleeve and its corresponding Sleeve Lining right sides facing, matching the bottom seam of the Sleeve. Sew to join. Trim off half of seam allowance and staystitch the seam allowance to the Sleeve Lining.
– Fold the Sleeve vertically, right sides facing in. Match the underarm seam and sew.
7. Gather sleeve cap and set in the sleeve
Video tutorial: https://tianascloset.com/index.php/2023/11/06/how-to-sew-set-in-sleeve/
– Stitch two parallel gathering stitches along the sleeve cap, between the two markings at the back and at the front of the sleeve. Leave the ends of threads on each side, at least 10 cm (4 inches) long.
– The first stitch line should be placed at 0.3 cm (1/8 inch) above the marked stitch line, the second stitch line should be placed at 0.5 cm (1/4 inch) above the first stitch line. Gather ease, pulling the lower thread. Press the cap of the sleeve, easing it in, 1-1.5 cm (half an inch) at a time.
– Turn the Sleeve right side out and place it to the armhole opening of the main garment. The underarm seam of the Sleeve should line up with the side seam of the Main Garment. The highest notch on the cap of the sleeve should line up with the shoulder seam. Baste the sleeve into the armhole, matching the notches at the front and back armholes with the notches at the front and back sides of the cap.
– Pin and sew the armhole seam. Press the seam allowance toward the Sleeve.
8. Sew the Neckline Facing
Video tutorial: https://tianascloset.com/index.php/2023/05/01/how-to-sew-neckline-with-facing/
– Apply fusible interfacing on the corresponding pieces.
– Place Front Facing and Back Facing right sides together, sew the shoulder seams.
– Place the Neckline Facing and main garment right sides facing, matching the center front, center back points and shoulder seams. Pin into place.
– Sew the neckline seam, pivot fabric at the back neck point. Trim off half of the seam allowance, clip corners and curves for smoother neckline.
– Press and staystitch the seam allowance to the Neckline Facing piece.
9. Finish the sleeve and dress hem
Turn the edge of the hem towards the wrong side of the fabric. Press the folded hem in place with an iron to create a crisp edge.
Choose your desired finishing method:
- Topstitch: Sew a straight stitch along the folded edge of the hem, securing it in place.
- Slip Stitch: Use a hand sewing needle and matching thread to invisibly stitch the folded hem to the main fabric.
This is the link to download this pattern: Emma dress
Happy sewing!
Tiana
Pingback: Free Pattern Review: Emma by Tiana’s Closet – Comedy of Errors