

The Caroline Structured Maxi Dress is a modern, architectural design that balances clean lines with striking details. This pattern is created for sewists who love statement silhouettes with thoughtful construction.

The dress features a structured bodice with carefully placed panel lines that shape the waist and flow into an elegant maxi-length skirt. The bold stripe-friendly design makes it especially suitable for directional fabrics, allowing you to create strong visual impact while maintaining a refined look.
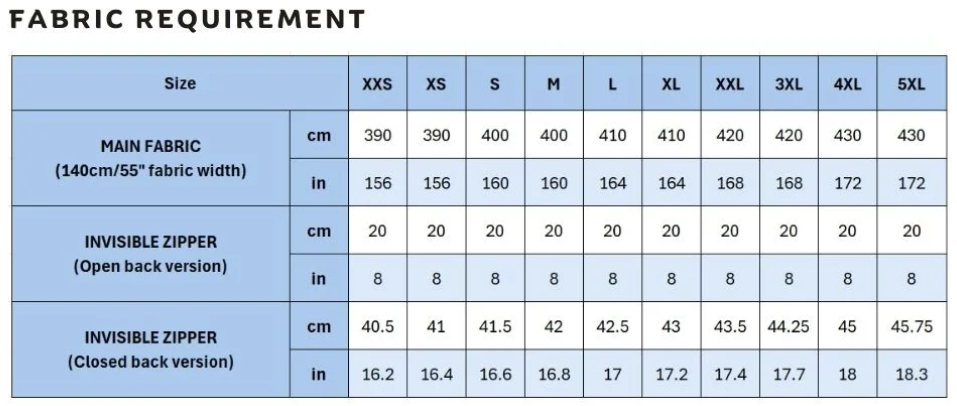
Two Back Options Included
This pattern offers two distinct back variations, so you can tailor the dress to your personal style:
- Open back version – for a confident, edgy look with a contemporary feel
- Closed back version – for a more modest, classic, and versatile style


Both versions share the same beautifully finished tie-back neckline, which adds softness and adjustability while highlighting the back of the dress.
Design Highlights
- Structured bodice with flattering seam lines
- Tie-back neckline for an elegant finish
- Maxi-length skirt with fluid movement
- Two back options: open back or closed back
- Ideal for striped, graphic, or solid fabrics


Skill Level
This pattern is best suited for intermediate sewists, as it involves precise panel matching, structured shaping, and careful neckline finishing.
The Caroline Structured Maxi Dress is perfect for special occasions, modern wardrobes, or statement everyday wear—an eye-catching design that feels both bold and timeless.
Pattern Information
This pattern is available in ten different sizes, ranging from XXS up to 5XL. Be sure to consult the measurement table to select the size that suits you best. Size guide can be found in the pattern, or here: SIZE GUIDE.
The pattern is provided as a layered PDF; please verify your required size prior to printing to avoid unnecessary paper usage. A detailed first page outlining sizing and printing instructions is included, so it is recommended to review this information thoroughly to confirm your selection. If you require further guidance on printing a layered PDF, please refer to the printing instructions provided in this post: PRINTING GUIDE.
My patterns are available in Projector files, A4/Letter, and A0 formats for easy printing at home or any print shop. You can use either A4 or Letter paper, as the printing area suits both. Always print the first page and check the test square to ensure correct scaling before printing the full pattern to avoid wasting resources.
Cutting & Sewing Instructions
Because most fabric will shrink after the first time washing and ironing, it is necessary to pre-wash your fabric. This does not only stop future shrinkage but also removes excess dyes and chemicals from the production process.
The fabric estimation is for pre-washed, pre-shrunk fabric. You may need to account for the shrinkage when using fabric that is not prepared.
If you choose to use fabric of different widths, color blocking, or mixed media, the amount of fabric needed will vary. It will depend on the selected pattern size, the width, and design of the fabric you plan to use. If you want to be sure, print all the paper patterns and lay them out at the width of fabric you plan to use. Measure how much fabric you will need. Don’t forget to account for pieces that need to be cut multiple times and pieces that are cut on the fold.
TOOLS AND MATERIAL
• Fabric of your choice. This design is drafted for lightweight, flowy woven fabric like silk, satin, chiffon, crepe etc.
• Invisible zipper for back closure.
• Lightweight fusible interfacing for sleeve cuffs.
• (Optional) Fusible stay tape to stabilize the seams.
• Matching thread
• Sewing machine
• Tailor chalk/erasable marker, Ruler, Pin/clips, Scissors, Iron and ironing board
• (Optional) Serger for a professional finish.
PATTERN PIECES
- Front Bodice: cut 2 mirrored pieces
- Back Bodice: cut 2 mirrored pieces
- Side Front Bodice: cut 2 mirrored pieces
- Side Back Bodice: cut 2 mirrored pieces
- Front Skirt: cut 2 mirrored pieces
- Back Skirt: cut 2 mirrored pieces
- Sleeve: cut 2 mirrored pieces
- Sleeve Cuff: cut 2 mirrored pieces
- Neckband: cut 1 piece on the fold
SEAM ALLOWANCE
- All seams: 1.5cm (5/8”)
- Seam allowance has been included in the pattern pieces. Cut pattern as is and use the above-mentioned seam allowance when constructing the garment.
CUTTING INSTRUCTION
This is a very fabric hungry pattern – especially if you need to match the prints. Make sure you have enough fabric in hand!
Place the pattern pieces on the fabric, pin the pattern pieces to the fabric to secure them in place. Using sharp scissors, carefully cut out the fabric pieces along the outer lines of the pattern. Take your time to ensure precise and clean cuts, as this will affect the fit and overall appearance of your garment.
Make sure to mark all notches and other design features such as darts, pleats, draw marks etc. from the pattern pieces onto your fabric. When sewing the garment, pay attention to notches, they must match up.
SEWING INSTRUCTION
1. Preparation
- Serge/zigzag stitch the edges to prevent fabric from unraveling.
2. Sew the front dress
- Place the Side Front Bodice and Front Skirt right sides together, match the bottom edge of the Side Front Bodice with the top edge of the Front Skirt and stitch. Press seam allowances towards the bodice.
- Match the pleat markings at the bottom of the Front Bodice to create a knife pleat. Press the bulk toward the side seam and baste.
- Place the Front Bodice and the stitched lower front part right sides together, match the bottom edge of the Front Bodice with the top edge of the lower front dress and stitch. Press seam allowances towards the lower bodice.
- Place two front dresses right sides together, match the center front seam. Make sure the ends of the waist seam line up perfectly for a clean finish. Stitch. Press seam allowances open.
3. Sew the back dress
Place the Back Skirt and Side Back Bodice right sides together, match the top edge of skirt with the bottom edge of side back bodice and stitch. Press seam allowances toward the bodice.
3.1. Open back version
- (Optional) Apply a 1.5cm (5/8”) strip of fusible interfacing along the straight edge of the Back Bodice, and the top edge of the Side Back Bodice to reinforce the edge.
- Fold the seam allowance of the straight edge of the Back Bodice to the wrong side and topstitch to finish the edge.
- Place the Side Back Bodice and lower back dress right sides together, match the bottom edge of the Back Bodice with the top edge of the Side Back Bodice, so that the finished edge of the Back Bodice matches the notch on the Side Back Bodice. Stitch and press seam allowances towards the lower part.
- Repeat to get the other half of the back dress.
- Attach invisible zipper to the back dress and finish the center back seam (treat the seam allowance of the side back bodice as a facing). Video tutorial: https://tianascloset.com/index.php/2023/12/31/how-to-finish-invisible-zipper-end-on-a-garment-with-facing/
3.2. Closed back version
- Use the same sequence as with the front dress to get two back dress panels.
- Install invisible zipper to the center back seam. The invisible zipper goes from the notch on the back skirt to the notch on the back bodice.
- Fold the remaining seam allowances of the center back seam to the wrong side of fabric and topstitch to finish the edge.
4. Sew the main garment
- Place Front Dress and Back Dress right sides together, match the side seams. Make sure the ends of the seams on each piece match for a clean finish.
- Stitch to get the main garment. Press seam allowances open.
5. Sew the sleeves
- Finish the sleeve placket with bias binding, sew the sleeve seam and attach the cuff. You can find a very detailed instruction here: https://blog.fabrics-store.com/2018/01/23/sewing-glossary-how-to-sew-a-continuous-bound-sleeve-placket/
- Match the sides of the shoulder dart right sides together and stitch.
- Press seam allowances open.
- Turn the sleeve to the right side.
- Pin the sleeve to the garment, so that right sides are together. Match the notches on the front and back raglan seams. Stitch.
- Press seam allowances toward the bodice.
6. Sew the neckband
- Fold the neckband in half lengthwise and press.
- Line up one edge of the neckband with the neckline of the garment, right sides together, so that the ends of the neckline match the notches on the neckband (V notches for open back version, U notches for the closed back version). Stitch one layer of the neckband to the neckline.
- Fold the neckband in half lengthwise, with right sides together. Stitch around the edge of the neckband, leaving the segment already stitched to the neckline open. Backstitch at both ends of stitching line to secure the seam.
- Clip corners and turn the neckband to the right side.
- Fold the seam allowances of the unstitched segment to the inside of the neckband, so that the finished edge matches the stitching line of the neckline. Pin and slipstitch to finish the neckline.
7. Finish hem
- Fold the hem of the garment to the wrong side of fabric, each fold 0.6cm (1/4”) and press.
- Topstitch to finish the hem.
You can download the pattern from here: