
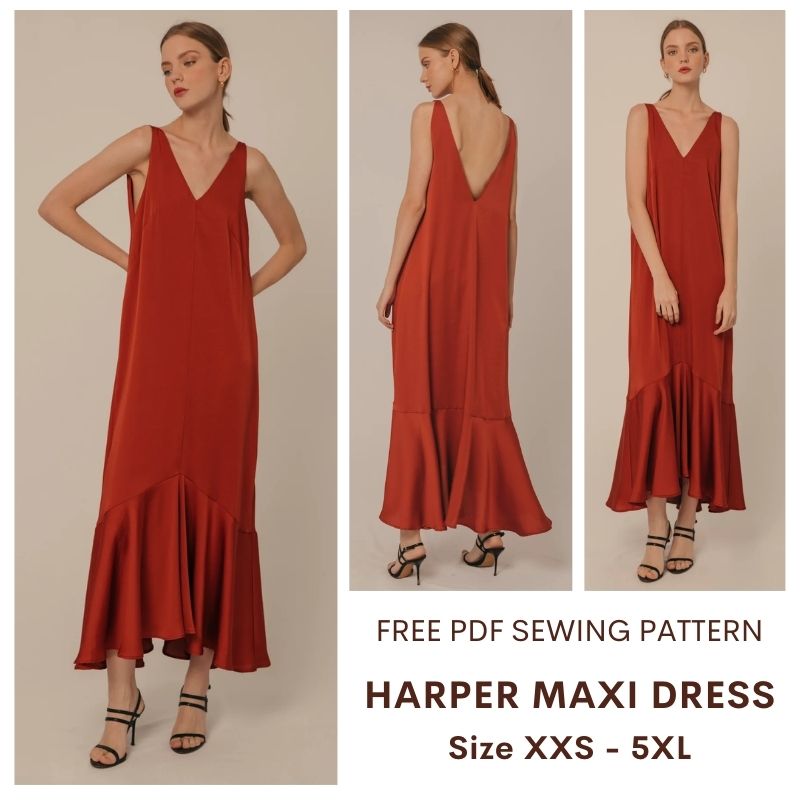
The pattern for today is the Harper maxi dress. It falls right at your ankles, has deep V neckline at the front and the back and a loose fit with ruffle high-low hem. The high-low silhouette adds a touch of drama and uniqueness to this timeless wardrobe staple. If you’re wondering how to rock this trendy piece, I’ve got some fabulous ideas for you:
– Effortlessly Boho: Embrace your inner bohemian spirit by pairing your mullet hem maxi dress with a floppy hat, layered necklaces, and some comfy suede ankle boots. Complete the free-spirited look with a fringed crossbody bag and statement rings. For your hair, let it flow naturally, and maybe even add some loose waves for that extra touch of boho glam.
– Chic and Sophisticated: Take your mullet hem maxi dress to the next level by adding some elegant touches. Slip into a pair of strappy heels, layer on a tailored blazer, and grab a sleek clutch for a sophisticated evening ensemble. Opt for delicate jewelry and a bold lip color to make a stylish statement. This combination is perfect for a cocktail party or a special date night.
– Edgy Rocker Vibes: Infuse your outfit with an edgy rocker vibe by teaming your mullet hem maxi dress with a leather jacket and ankle boots with metallic accents. Accessorize with chunky jewelry like a studded cuff bracelet or a statement choker. Play around with dark, smoky eye makeup and a bold lip color to complete the rocker-chic look.
– Beachy Boho: If you’re heading to the beach or planning a summer getaway, style your mullet hem maxi dress with a floppy sun hat, oversized sunglasses, and strappy sandals. Opt for a lightweight, flowy fabric to capture that ethereal beachy feel. You can even layer on a crochet vest or a kimono for an extra touch of boho charm. Don’t forget to pack your beach bag and a playful printed sarong to complete the look.
– Effortless Everyday: Dress down your mullet hem maxi dress for a casual day out. Pair it with comfortable flat sandals, a denim jacket, and a crossbody bag. Keep the accessories minimal and let the dress be the star of the show. This look is perfect for running errands, grabbing brunch with friends, or enjoying a leisurely weekend.
As usual, my pattern is made in 10 sizes from XXS to 5XL so you may find a suitable size for yourself. If you are not sure which size suits you, take a look at the measurement table before doing anything here: SIZE GUIDE.
The pattern is made using layered PDF, please check for your desired size before printing so you won’t waste your paper. I have included a first page with many details about sizing and printing, so please first read the first page and make sure you know what size you need! If you still do not know how to print a layered PDF, please check for the printing instruction in this post: PRINTING GUIDE.
You can print this using your home printer and A4/Letter paper. I calculated the printing area so that you will be able to use either type of paper to print the pattern out perfectly. Always print the first page first and check with the test square if you are printing at the right scale before you print out the whole pattern – avoid waste of ink and waste of paper, save the earth!
Some PC may print smaller than actual size even when you choose 100% scale – I don’t know why this problem exist, but my HP laptop cannot print true to size. I have to scale up to 103% to get the right size. You may need to check with your PC to see if it prints true to size, if not, scale up a bit.
SEWING INSTRUCTION
You will need
- Fabric of your choice. This pattern is made for woven fabric, I recommend silk, pure cotton or linen fabric for a comfortable summer day
- Some fusible interfacing
- Bias tape for neckline and armhole binding if you don’t want to sew facing
- Scissors, pencil or fabric marker, ruler, pins
- Sewing machine/Serger or needle and thread
- Printed pattern
How much fabric do you need for this piece of garment? This garment is going to need a lot of fabric. To be precise, you may need to check how much fabric you need before buying. It will depend on the selected pattern size, the width, and design of the fabric you plan to use. Just to be sure, print all the paper patterns and lay them out at the width of fabric you plan to use (usually from 90 to 150 centimeters or 35 to 60 inches). Measure how much fabric you will need. Don’t forget to account for pieces that need to be cut multiple times and pieces that are cut on the fold.
Cutting instruction:
After printing out and taping all the pattern pages together, you will get something similar to this:

You will see that there are 2 sets of lines on each pattern piece. The inner lines are sewing line (and you sew along these lines), and the outer lines are cutting lines (you cut the fabric along these lines, remember the folding lines where you have to fold the fabric before cutting). The distance between sewing line and cutting line is seam allowance, and it varies from point to point. For example, the side seam allowance is about 1/2 inch (1.2cm), and seam allowance at hemline is 1 inch (2.5cm). This is the reason why I do not remove the sewing lines from the pattern. Please use it as a guide to know how much seam allowance you need to give at each seam.
The fabric will be cut into following pieces:
- Front: cut 1 on the fold
- Back: cut 1 on the fold
- Front Facing: cut 1 self fabric + 1 fusible interfacing (on the fold)
- Back Facing: cut 1 self fabric + 1 fusible interfacing (on the fold)
- Ruffle: cut 2 on the fold
- You can omit the Front Facing and Back Facing and use bias binding to finish the armholes and neckline
Place the pattern pieces on the fabric, pin the pattern pieces to the fabric to secure them in place. Using sharp scissors, carefully cut out the fabric pieces along the outer lines of the pattern. Take your time to ensure precise and clean cuts, as this will affect the fit and overall appearance of your garment.
Make sure to mark all notches and other design features such as darts, pleats etc. from the pattern pieces onto your fabric. When sewing the garment, pay attention to notches, they must match up.
Sewing instruction:
1. Serge/zig zag stitch the edges of the fabric pieces to prevent fabric from unraveling.
2. Place the Front and Back dress pieces right side facing. Pin and sew the shoulder seams.
3. Apply fusible interfacing to Front Facing and Back Facing. Place two facing pieces right side facing. Pin and sew the shoulder seams.
4. Place the joined facing piece and the main garment right side facing. Pin around the neckline, matching all the seams. Sew around the neckline. Trim and clip the seam allowance for smoother turning points. Staystitch the seam allowance on the facing piece. Turn the facing in, press the neckline.
5. Because this dress has an all in one facing with a narrow shoulder width, you will need to use a bit of hand stitching to finish the facing. Start on one side of the armhole at the shoulder seam, carefully fold the seam allowance at the shoulder inward, remember to match the shoulder seam on both main garment and facing pieces. Pin from the right side to hold both of them together. Continue along the armhole until it is wide enough for you to pin from the wrong side of the fabric. Start sewing from the underarm toward the shoulder point until you cannot sew further. Repeat with the other side of the armhole. You will get a partly finished armhole with the smallest part near the shoulder point unfinished. Use ladder stitches to finish this part. Repeat with the other armhole.
6. Sew the side seams of the dress. You can also add side seam pockets to the dress for more convenience. Tutorial on how to sew side seam pocket here.
7. Sew the side seams of the Ruffle pieces. Place the Ruffle and the main garment right side facing, matching the center points and the side seams. Pin and sew to attach the Ruffle to the main garment.
8. Hem the garment, give it a good ironing and you’re done.
And here is the download link:
HARPER MAXI DRESS (SIZE XXS – 5XL) A4/LETTER PAPER
HARPER MAXI DRESS (SIZE XXS – 5XL) A0 PAPER
To download just click on the link above and choose “Save link as”. The PDF file will be downloaded to your device.
Happy sewing! And don’t forget to share your project on my Facebook page: Tiana’s Closet Sewing Patterns
Tiana